
You are using an out of date browser. It may not display this or other websites correctly.
You should upgrade or use an alternative browser.
You should upgrade or use an alternative browser.
Why oh why am I building a ' very low ' racing bike called 10% , when I am the wrong side of 65 ?
- Thread starter stormbird
- Start date
From your last point there Paul, I wonder if any riders of this type of machinery have ever tried a std diamond frame bike around a track as a reference point to their created racers?
They don't need to standard bikes are encouraged and even win [ apparently ]
If there are enough entrants there is a slow and fast race , this was the slow race as can be seen by no faired bikes and lots hand cycles.
Paul
So today has NOT gone well and design decisions made on day 1 have come back to bite me in the bum big time.....
A throw away remark to DannyC in today's ' chew the cud ' talk ' I bet if I put a length of cable in the mech to hold it in 2nd I could ride this ' set off a train of events that have led to some very bad discovery's.
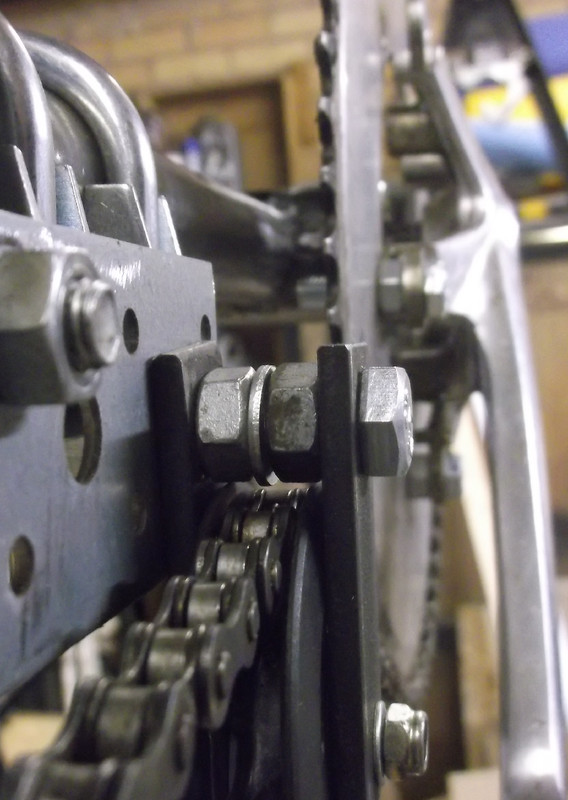
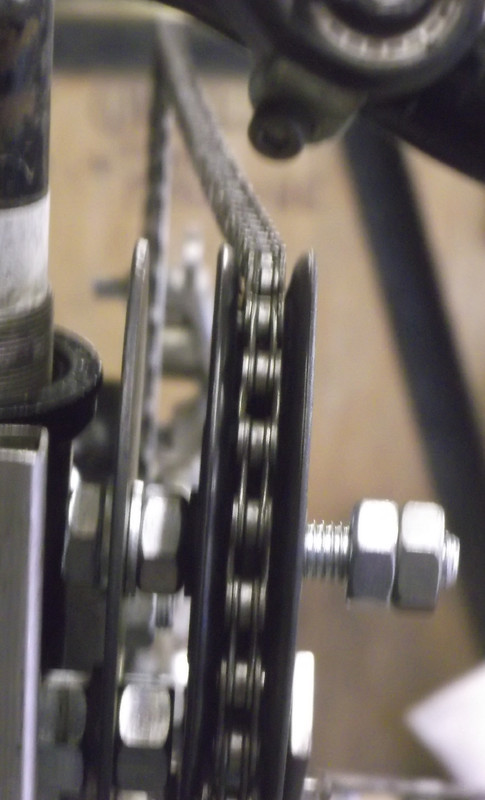
First I did shorten the screws in the pulley and removed the extra M12 nut getting it much closer to the frame an [ I though ] much improving the chain angle i.e it is now neared the middle of the cassette...
Now at the bottom this looks great however the picture reveals that all is not well at the top , I did not spot this whilst out there so have not investigated further yet.
I though if I put a better rear mech on I may even get it locked into first gear , for that I needed to improve this
Just a simple kids one held by the wheel nut [ naughty boy ]
So I hacked a frame up with the later styled hanger leaving the stays on I could see where it needed to go.
I cut free the piece I needed and trimmed it to fit , instead of welding it I decided to hold it again with the wheel nut just to see if it worked.
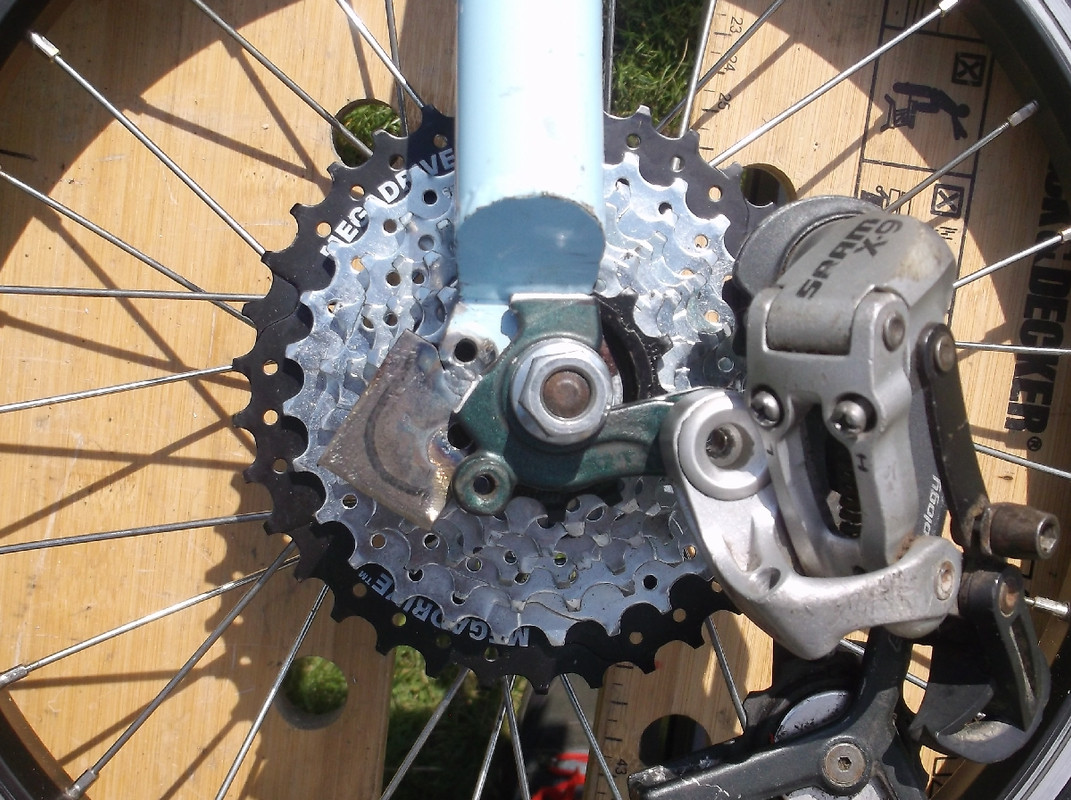
I though this may have been one of my better mechs a SRAM X-9 and duly fitted it.
Now I have some sage words at this point.
IF you intend using a s/h mech check that both the jockey wheels spin freely BEFORE you mount the wheel in the frame split the old chain and try to feed it through the mech !
It saves a lot of tears.
After a break and some comfort eating I tried to swap the mech for a SRAM X-5 , would you credit it it also had a jammed lower jockey wheel.
At this point I had a much newer mech that looked as though it had been barely used in a stash of parts Dale-Rider kindly donated to the cause , it's only a Shimano Tourney but looked clean. So it was duly fitted and all back together I could try it, the extra thickness of the mounting plate put the mech to far out however using all it's adjusting screw I was able to get the chain to fit comfortably on the 8th gear , so 1 more than yesterday hurrah you say , however this was short lived as when I tried to get to 1st I found the lower mech jockey wheel fouls the TYRE ??? I assume because I have a 16" wheel the mech cannot operate inside the wheel diameter , although that does sound like a recipe for disaster as there are tales of the front tyre snagging the chain and causing all sorts of problems. A shorter cage mech may mean 1st is available but safely ? do I need 7 speed ? well probably not an answer as 1st will still be in the same place ?
So I tried in vain to clamp the mech in second , that is just not possible with only 2 hands so giving up I took it outside in the hope the slope off the drive would help a start in 8th !
Now a 2 wheeler problem turned up as there is no brake it was hard to hold if whilst I got a foot on the pedals and also any attempt to pedal would cause the overlong bolt on the small pulley to carve my leg up.
A freewheel down the Close was all I achieved , I did learn with only 10" handle bars a shrug of the shoulders were enough for it to move off line about 3ft scary
Maybe it could be tried with a brake fitted and a shorter bolt so out with the parts , err NO with a capital NO !
DannyC's method of widening a front fork for a rear wheel has an unnecessary side effect ? it widens the brake posts also then the brakes no longer meet the wheel ?
I remember the shoes have 2 spacers thick and thin so I swapped them over that did mean they could reach the wheel rim however only the lower half below the wear groove in the brake surfaces and this happened at the top.


I think the best plan at the moment is to cut free the bridge from the suspension fork and weld in the same position as the existing brake mounts ?
I may be able to get it to work.
Lots of work almost no progress and still no ride..
Paul
A throw away remark to DannyC in today's ' chew the cud ' talk ' I bet if I put a length of cable in the mech to hold it in 2nd I could ride this ' set off a train of events that have led to some very bad discovery's.
First I did shorten the screws in the pulley and removed the extra M12 nut getting it much closer to the frame an [ I though ] much improving the chain angle i.e it is now neared the middle of the cassette...
Now at the bottom this looks great however the picture reveals that all is not well at the top , I did not spot this whilst out there so have not investigated further yet.
I though if I put a better rear mech on I may even get it locked into first gear , for that I needed to improve this
Just a simple kids one held by the wheel nut [ naughty boy ]
So I hacked a frame up with the later styled hanger leaving the stays on I could see where it needed to go.
I cut free the piece I needed and trimmed it to fit , instead of welding it I decided to hold it again with the wheel nut just to see if it worked.
I though this may have been one of my better mechs a SRAM X-9 and duly fitted it.
Now I have some sage words at this point.
IF you intend using a s/h mech check that both the jockey wheels spin freely BEFORE you mount the wheel in the frame split the old chain and try to feed it through the mech !
It saves a lot of tears.
After a break and some comfort eating I tried to swap the mech for a SRAM X-5 , would you credit it it also had a jammed lower jockey wheel.
At this point I had a much newer mech that looked as though it had been barely used in a stash of parts Dale-Rider kindly donated to the cause , it's only a Shimano Tourney but looked clean. So it was duly fitted and all back together I could try it, the extra thickness of the mounting plate put the mech to far out however using all it's adjusting screw I was able to get the chain to fit comfortably on the 8th gear , so 1 more than yesterday hurrah you say , however this was short lived as when I tried to get to 1st I found the lower mech jockey wheel fouls the TYRE ??? I assume because I have a 16" wheel the mech cannot operate inside the wheel diameter , although that does sound like a recipe for disaster as there are tales of the front tyre snagging the chain and causing all sorts of problems. A shorter cage mech may mean 1st is available but safely ? do I need 7 speed ? well probably not an answer as 1st will still be in the same place ?
So I tried in vain to clamp the mech in second , that is just not possible with only 2 hands so giving up I took it outside in the hope the slope off the drive would help a start in 8th !
Now a 2 wheeler problem turned up as there is no brake it was hard to hold if whilst I got a foot on the pedals and also any attempt to pedal would cause the overlong bolt on the small pulley to carve my leg up.
A freewheel down the Close was all I achieved , I did learn with only 10" handle bars a shrug of the shoulders were enough for it to move off line about 3ft scary
Maybe it could be tried with a brake fitted and a shorter bolt so out with the parts , err NO with a capital NO !
DannyC's method of widening a front fork for a rear wheel has an unnecessary side effect ? it widens the brake posts also then the brakes no longer meet the wheel ?
I remember the shoes have 2 spacers thick and thin so I swapped them over that did mean they could reach the wheel rim however only the lower half below the wear groove in the brake surfaces and this happened at the top.
I think the best plan at the moment is to cut free the bridge from the suspension fork and weld in the same position as the existing brake mounts ?
I may be able to get it to work.
Lots of work almost no progress and still no ride..
Paul
DannyC
0
I knew I would get the blame for this.DannyC's method of widening a front fork for a rear wheel has an unnecessary side effect ? it widens the brake posts also then the brakes no longer meet the wheel ?
Cut the mounts off and put them on a steel tab.
Weld steel tab to fork leg. Brake pivot posts now further in.
DannyCI knew I would get the blame for this.
Cut the mounts off and put them on a steel tab.
Weld steel tab to fork leg. Brake pivot posts now further in.
I assume your build was a delta trike with rear brakes so this was not noticed ? maybe the fork did not even have V brake pivots ?
Paul
DannyC
0
Hi Paul,DannyC
I assume your build was a delta trike with rear brakes so this was not noticed ? maybe the fork did not even have V brake pivots ?
Paul
I wasn't being too serious about "blame" as far as I am concerned its all just good banter.... yup you guessed it; my intended application was to have 2 rear drum brakes and so it was not a concern at that time.
All you have to do to remedy it is weld a decent strap/plate across at the correct height to fix your pivots too, then measure the distance between "normal pivots and mark your strap and weld the little devils on, then cut out the centre section. I did this on a high-roller where the front fork used as a rear fork needed it done.
Hi Paul,
I wasn't being too serious about "blame" as far as I am concerned its all just good banter.... yup you guessed it; my intended application was to have 2 rear drum brakes and so it was not a concern at that time.
All you have to do to remedy it is weld a decent strap/plate across at the correct height to fix your pivots too, then measure the distance between "normal pivots and mark your strap and weld the little devils on, then cut out the centre section. I did this on a high-roller where the front fork used as a rear fork needed it done.
DannyC
No blame I was trying to save your reputation
as someone who knew what he was doing hehehePaul
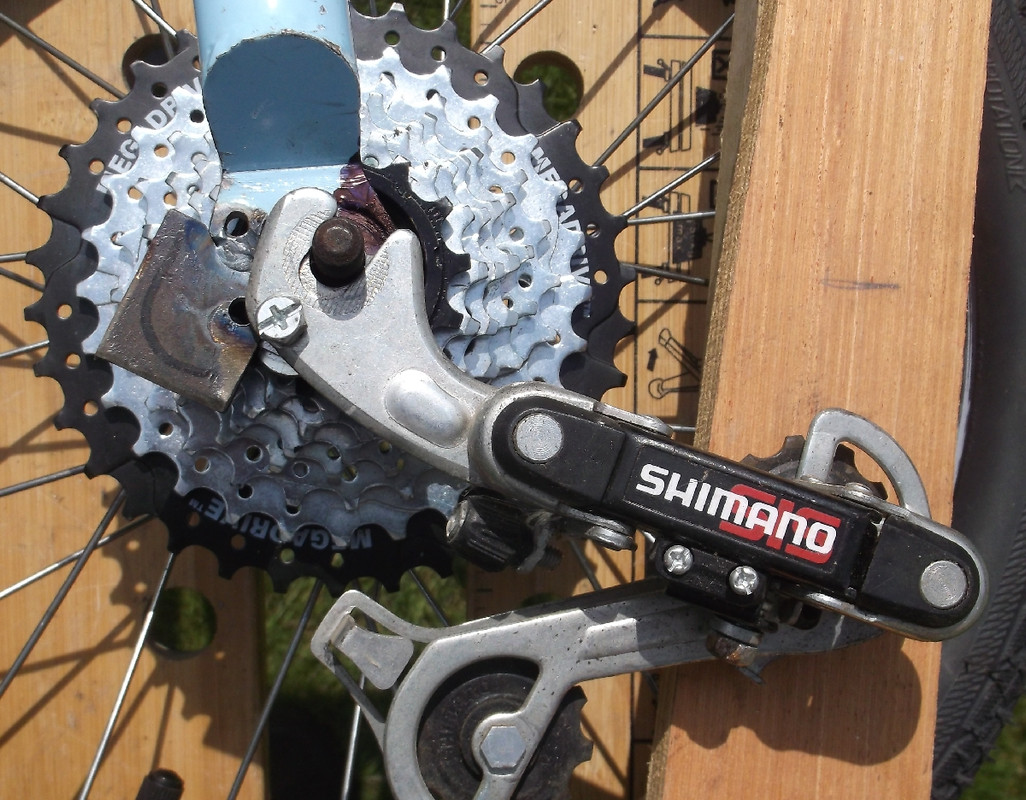
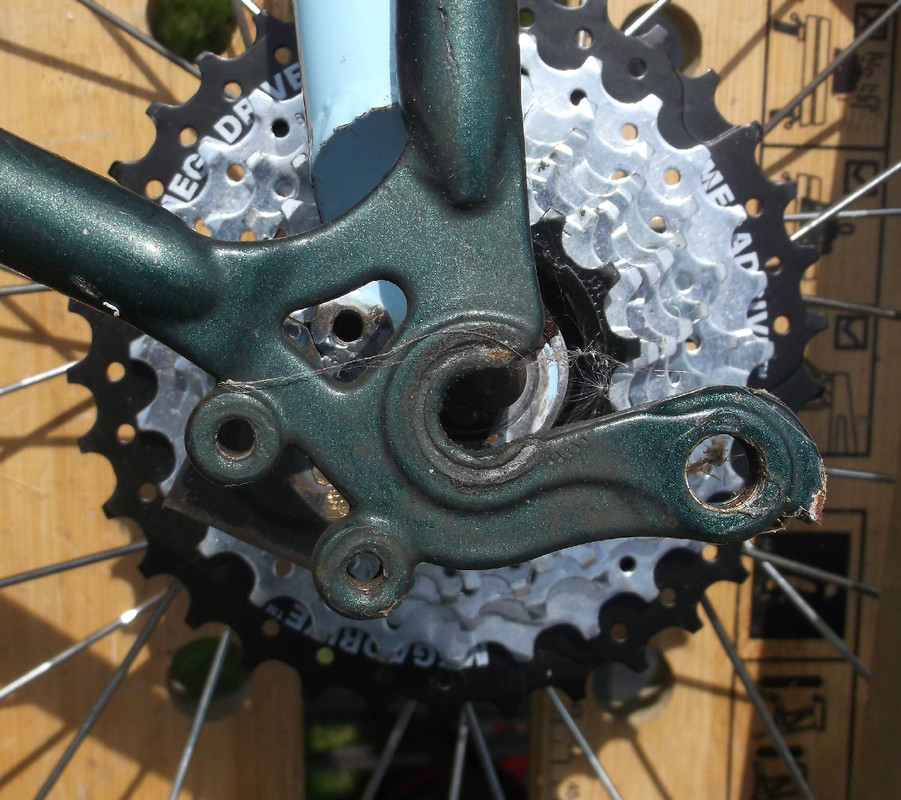
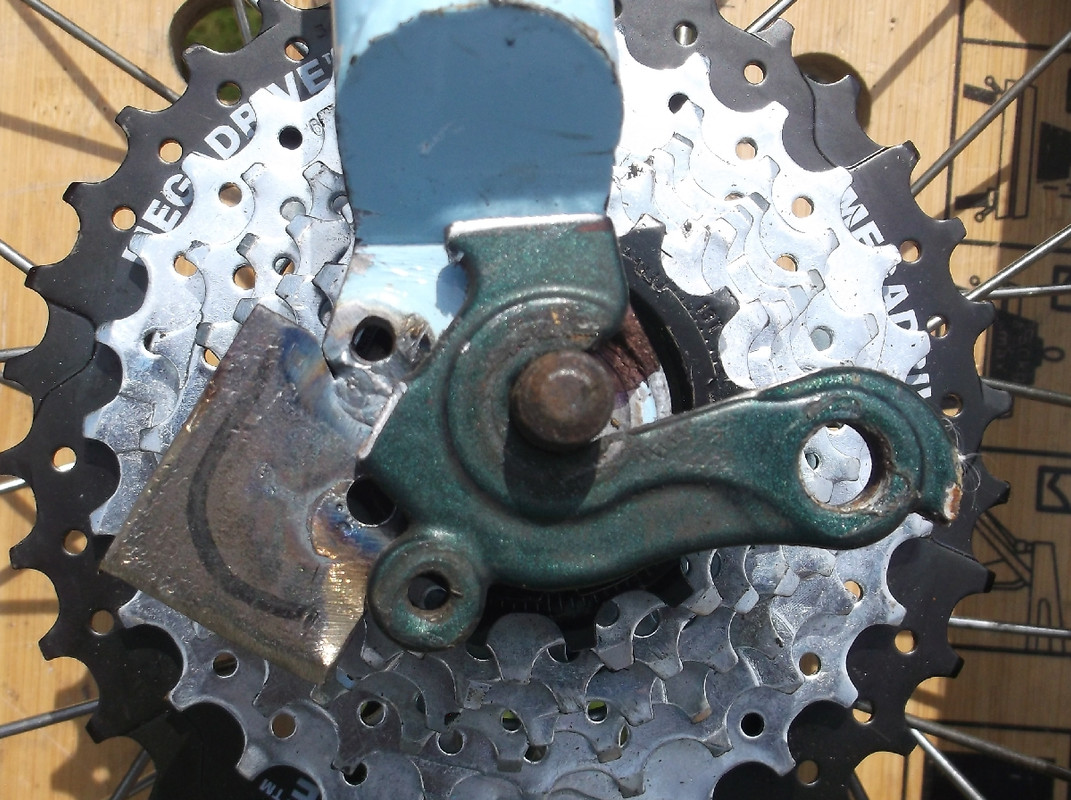
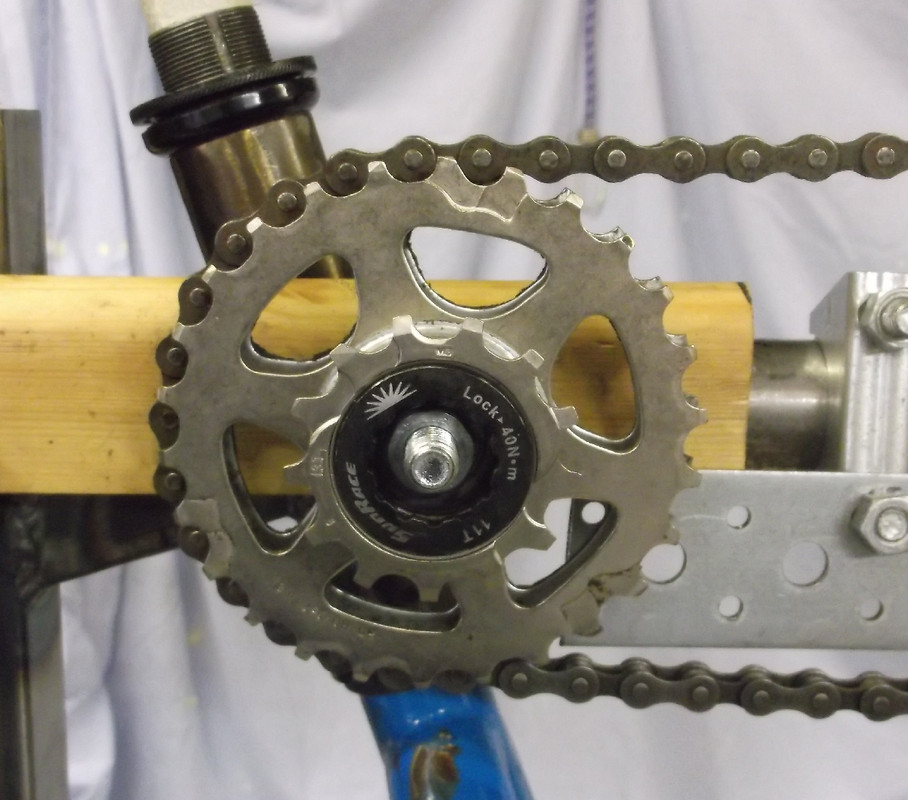
Yesterday I spent time trying [ and failing ] to dismantle 2 SunRace Freewheel Cassettes both new with 2 different style of locking rings:-


One had a smooth threaded lock ring [ on the left ] the other had a lock ring with a series of notches [ on the right ]
Anyone have any advice on how to free these ? I really want the lock rings in one piece as I want to swap sprockets and build a custom one without the big Megrange jump.
Is improving something progress ?
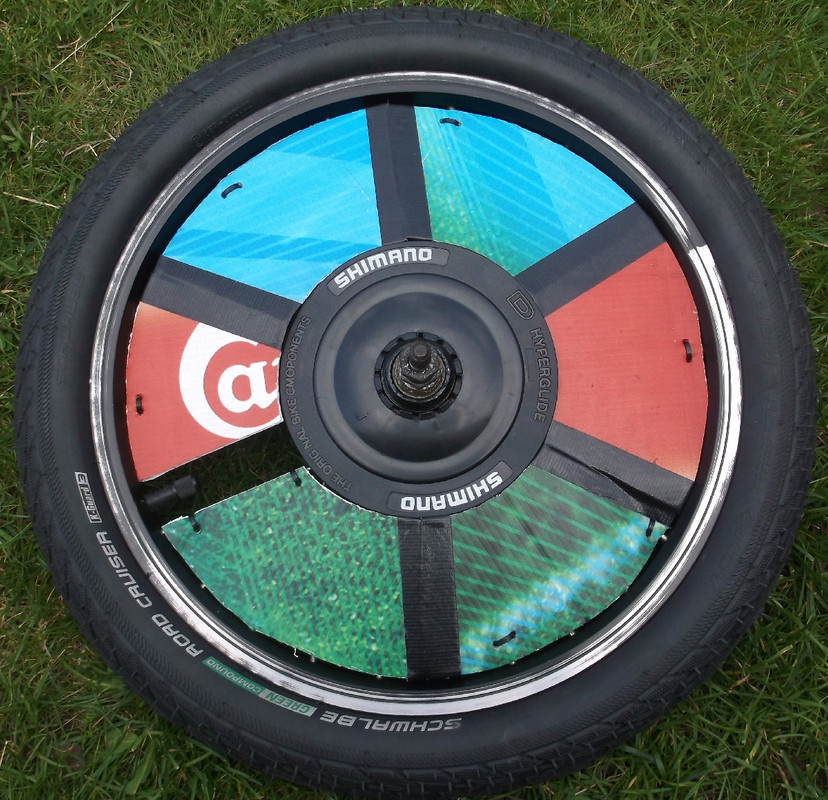
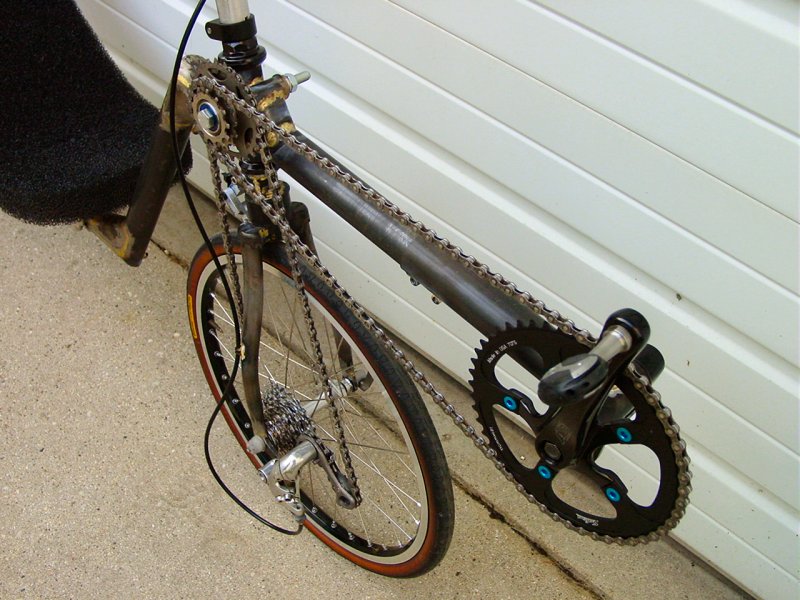
So I have covered the cassette side of the front drive wheel , really for my piece of mind should I have a chain issue.
Still it looks pretty.
Paul
One had a smooth threaded lock ring [ on the left ] the other had a lock ring with a series of notches [ on the right ]
Anyone have any advice on how to free these ? I really want the lock rings in one piece as I want to swap sprockets and build a custom one without the big Megrange jump.
Is improving something progress ?
So I have covered the cassette side of the front drive wheel , really for my piece of mind should I have a chain issue.
Still it looks pretty.
Paul
DannyC
Thanks for the idea simpler than the solution I found !

My "special tool" is made from an old socket (15/16" size IIRC).
It took me about ten minutes of frenzied angle-grinding to make the tool some time ago.
I don't believe there is a (commonly available) tool made for this job.
This lockring secures the sprockets to the splined freewheel body the four-dog fitting uses a tool which has a major diameter of 32.3mm, a minor diameter of 30.5mm. There are four equally spaced slots, each of which will accept a dog of ~9.5mm width.
The (male) lockring threads measure 36.7mm OD ]
Paul
Thanks for the idea simpler than the solution I found !
My "special tool" is made from an old socket (15/16" size IIRC).
It took me about ten minutes of frenzied angle-grinding to make the tool some time ago.
I don't believe there is a (commonly available) tool made for this job.
This lockring secures the sprockets to the splined freewheel body the four-dog fitting uses a tool which has a major diameter of 32.3mm, a minor diameter of 30.5mm. There are four equally spaced slots, each of which will accept a dog of ~9.5mm width.
The (male) lockring threads measure 36.7mm OD ]
Paul
Ok almost binned this.
I was quite depressed when I realised I would not make Darley Moor on the 27/28th and this whole project hung in the balance.
I have a very bad personality trait , I get something 75% done hit some snags and find it much easier to throw it in the back of the shed and start another design which of course has NO snags at all.....
I toyed with this design:-

Fred bikes
Look a no pulleys FWD bike however a quick conversation with Steve the builder revelled they could not be pedalled around corners without a risk of the chain coming off.
Now he has taken part successfully in loads of Audax's on these bikes so they are great on the road , however they would suck on UK race tracks so another dead end.
However couple of hours boring the pants off DannyC [ metaphorically ] he convinced me to rescue what I had done so far...
So currently the main problem is it is a 2 wheeler ! it is not possible to sit on it with both hands on the handle bars AND your feet on the pedals to see where the interference is that is stopping it being pedalled , 9 years of building trike's and so I did not realise how much of a problem this would be.
The answer ? saw the rear off !
Now I will weld a 10" section into the left hand part with a 5" plug sticking out and then any rear end I fancy 1 or 2 wheels can then be slid on and the 2 halves bolted together.
The first rear end will be 2 wheels making it a trike and so getting over a major problem.
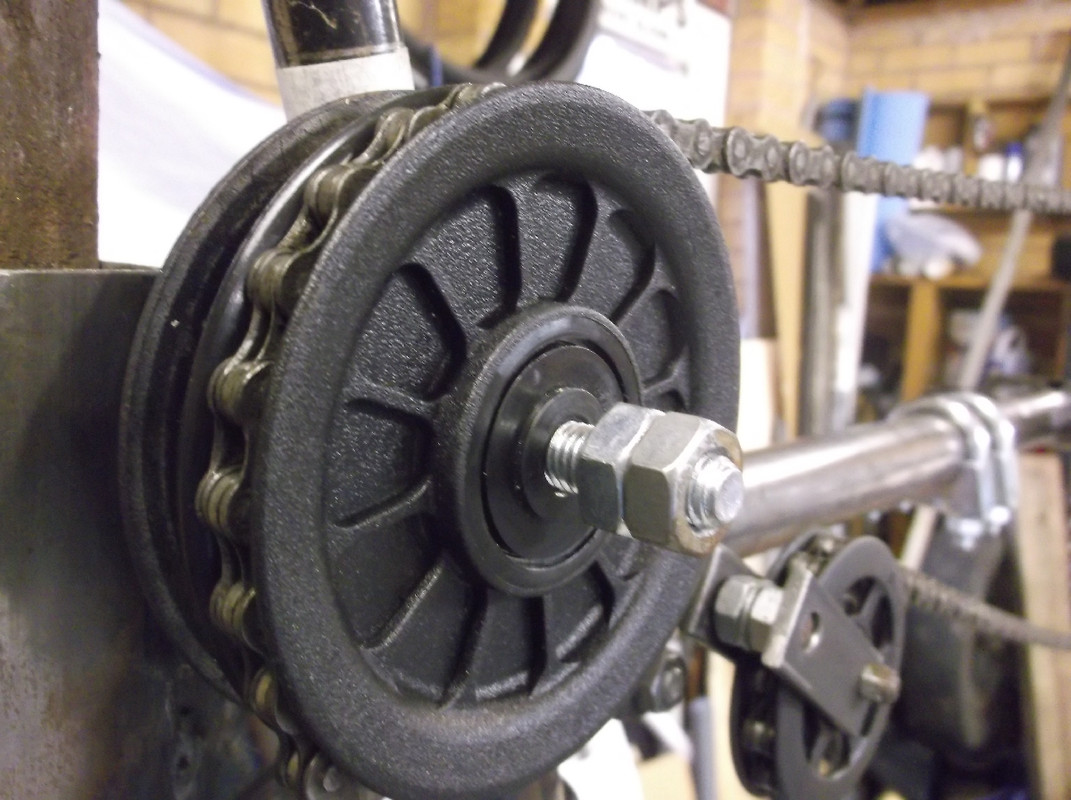
Next up much better pulley system , something like this.
Still needs a new front wheel sorting and maybe a fork.
New dead line is Hillingdon 15th October , hey that looks a lot of time from here - we will see.
Paul
I was quite depressed when I realised I would not make Darley Moor on the 27/28th and this whole project hung in the balance.
I have a very bad personality trait , I get something 75% done hit some snags and find it much easier to throw it in the back of the shed and start another design which of course has NO snags at all.....
I toyed with this design:-
Fred bikes
Look a no pulleys FWD bike however a quick conversation with Steve the builder revelled they could not be pedalled around corners without a risk of the chain coming off.
Now he has taken part successfully in loads of Audax's on these bikes so they are great on the road , however they would suck on UK race tracks so another dead end.
However couple of hours boring the pants off DannyC [ metaphorically ] he convinced me to rescue what I had done so far...
So currently the main problem is it is a 2 wheeler ! it is not possible to sit on it with both hands on the handle bars AND your feet on the pedals to see where the interference is that is stopping it being pedalled , 9 years of building trike's and so I did not realise how much of a problem this would be.
The answer ? saw the rear off !
Now I will weld a 10" section into the left hand part with a 5" plug sticking out and then any rear end I fancy 1 or 2 wheels can then be slid on and the 2 halves bolted together.
The first rear end will be 2 wheels making it a trike and so getting over a major problem.
Next up much better pulley system , something like this.
Still needs a new front wheel sorting and maybe a fork.
New dead line is Hillingdon 15th October , hey that looks a lot of time from here - we will see.
Paul
I have a very bad personality trait , I get something 75% done hit some snags and find it much easier to throw it in the back of the shed and start another design which of course has NO snags at all.....
You are not the only one.
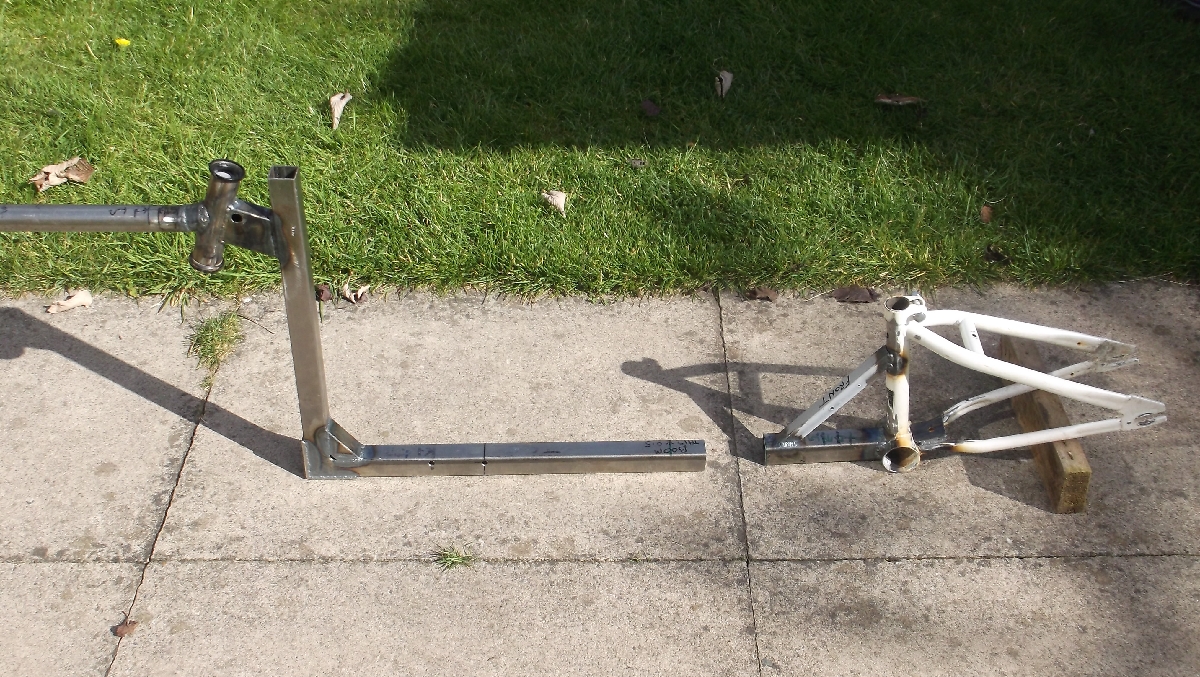
So plug was made from some sq tubing and 3mm angle iron , a 10" section was welded up and then the corners rounded till it was a tight fit.
It is nerve wracking when it is a hammer fit and fingers crossed the whole 5" go in else can't think of anyway to get it out should it be stuck.
Held with 4 plug welds looks good.
Now a standard piece of 1.25 sq slides on , odd thing is there are 4 orientations 2 it goes on easy 1 it tightens 1" from being flush and 1 it will not go on far at all ?
Guess which one I chose first
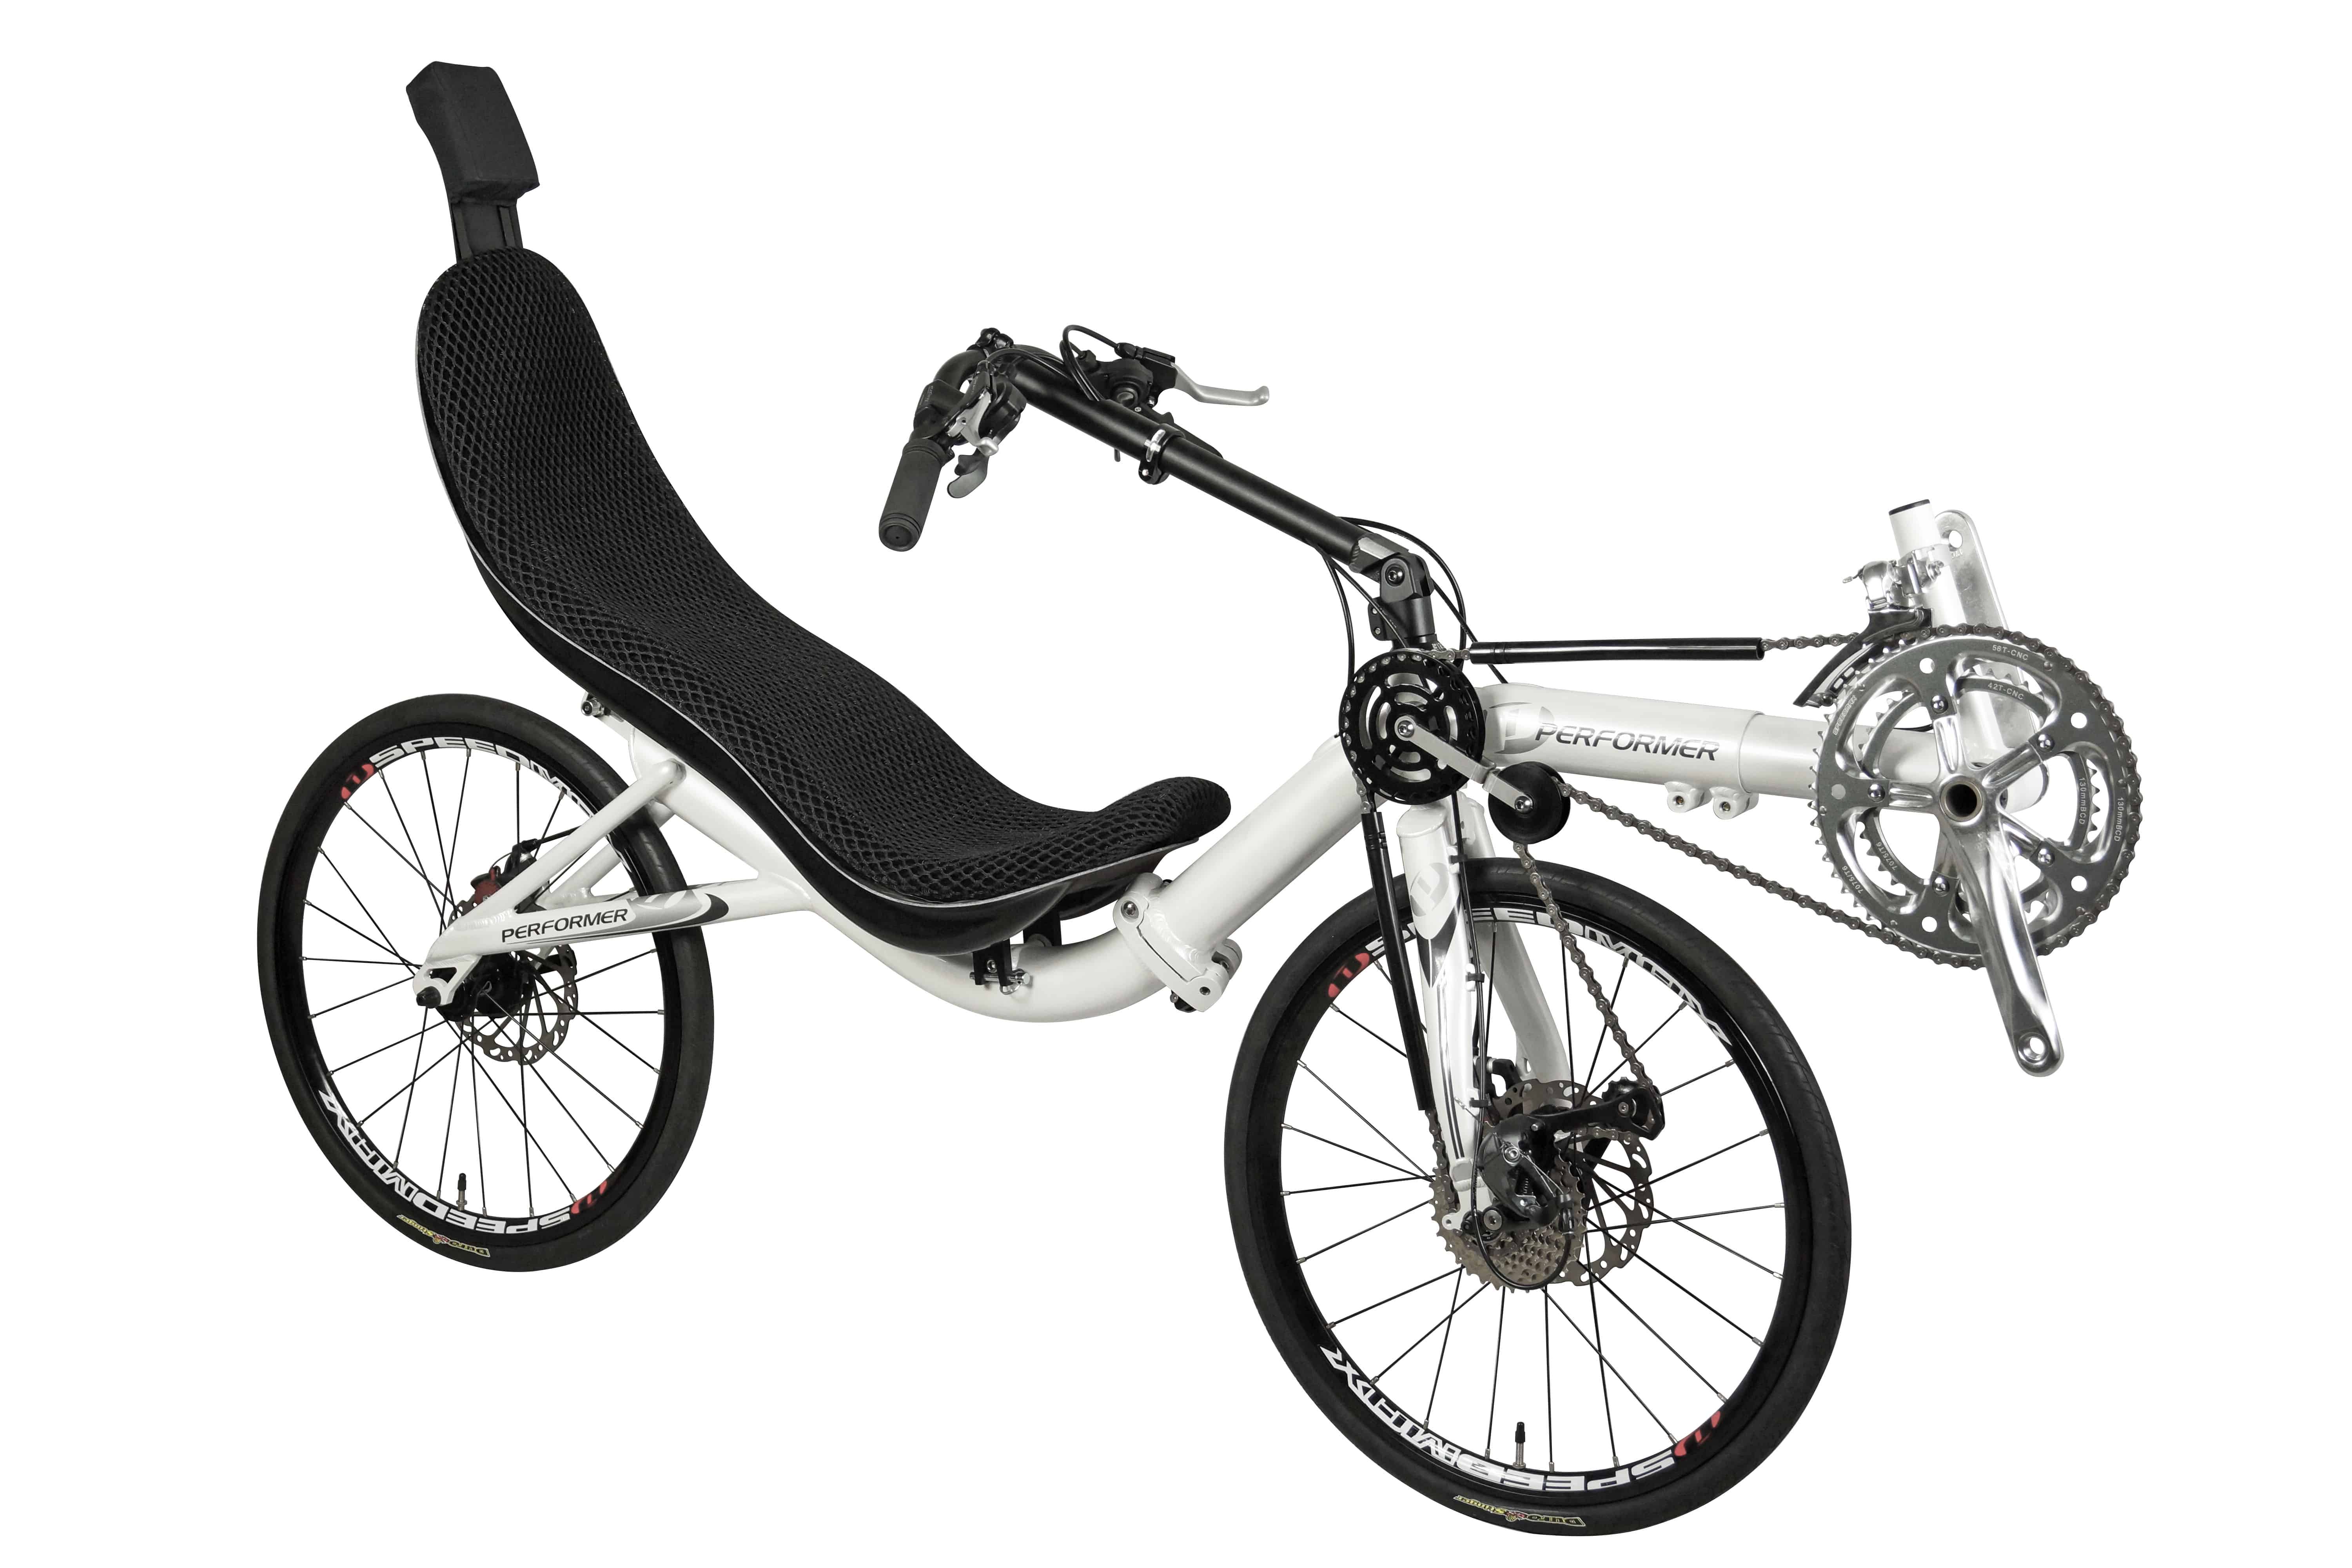
So this is where we are heading 40" wheel base and 14" track ?

Cos this is what we are after
It was very windy on the path the seat acted as a sail and trike would roll forward hence the wooded chock , then it exhibited different behaviour and the front wheel would be blown around to face to the right spooky.
Next up fix the back of the seat to the front portion and make a jig to drill 2 holes @ 90' to each other to fasten the front and rear together.
What should I use ?
Bolts and lock nuts ?
Q/R's
M8 or M10
Paul
It is nerve wracking when it is a hammer fit and fingers crossed the whole 5" go in else can't think of anyway to get it out should it be stuck.
Held with 4 plug welds looks good.
Now a standard piece of 1.25 sq slides on , odd thing is there are 4 orientations 2 it goes on easy 1 it tightens 1" from being flush and 1 it will not go on far at all ?
Guess which one I chose first
So this is where we are heading 40" wheel base and 14" track ?
Cos this is what we are after
It was very windy on the path the seat acted as a sail and trike would roll forward hence the wooded chock , then it exhibited different behaviour and the front wheel would be blown around to face to the right spooky.
Next up fix the back of the seat to the front portion and make a jig to drill 2 holes @ 90' to each other to fasten the front and rear together.
What should I use ?
Bolts and lock nuts ?
Q/R's
M8 or M10
Paul
OK skirting around the elephant in the room ?
The front fork I modified is pants and will not work in this application.
So being short of usable front forks [ only 2 left and one maybe not suitable ] I decided to revisit the blue one and see if I could get it better ?
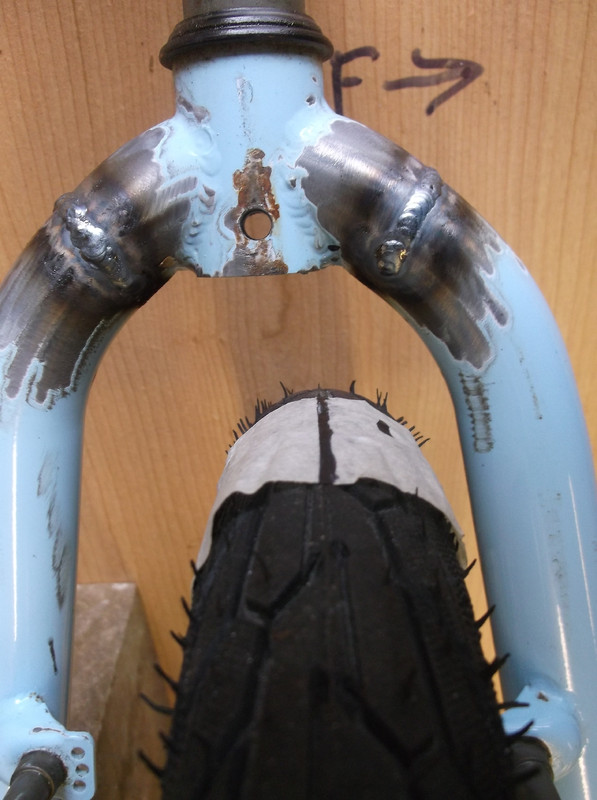
Both the blue forks had been built with the logic that the centre of the axle needed to be in the centre of the fork resulting in the wheel looking like this when fitted ?
This is because single speed wheels have no dish and equal length spokes , I was able to dish the wheel and bring the centre of the tyre into the centre of the fork only to find the spokes were almost vertical and the rear mech now hit the spokes/rim before first gear was reached.
So what to do ?
I cut the lower legs free and marked the centre of the wheel hub on an axle then bolted on the lower legs and lined that assembly up with the centre of the upper fork part.
4 tack welds later and it looked fair [ good would be pushing it ! ] so having a free undished wheel I tried that and it looks good,
Next up see if the rear mech works properly and I can get first gear without wheel contact.
Drawing a blank on reasonably priced pulleys I am revisiting the 2 chain solution , however this time more parts will be adjustable instead of just 2 front 28T sprockets bolted back to back as the main combiner.
Although mine seems to be the other way around with the cranks driving the rear sprocket and hoping the front sprocket will drive the cassette ?
More pictures to come.
Paul
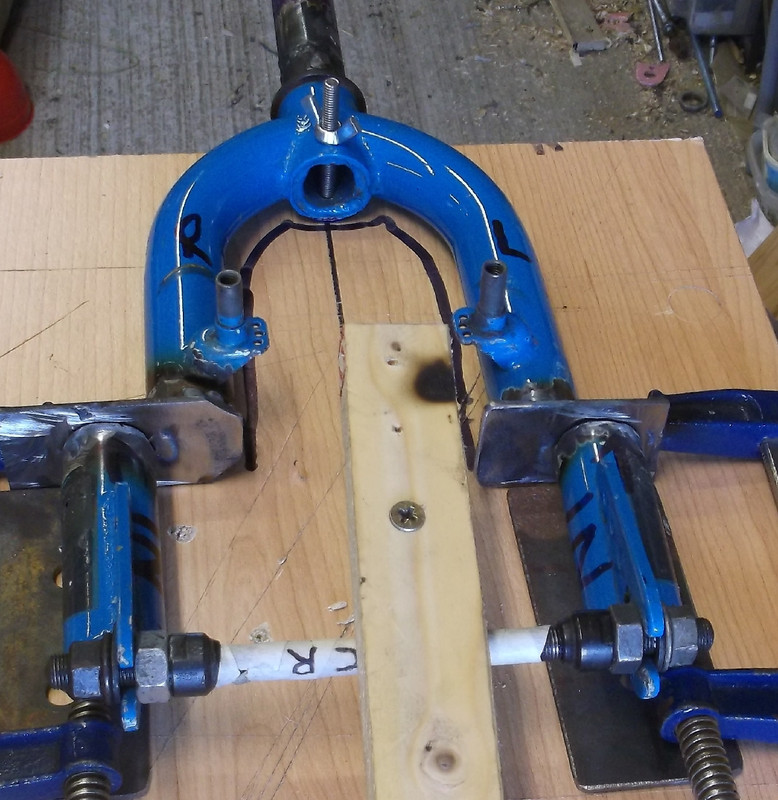
The front fork I modified is pants and will not work in this application.
So being short of usable front forks [ only 2 left and one maybe not suitable ] I decided to revisit the blue one and see if I could get it better ?
Both the blue forks had been built with the logic that the centre of the axle needed to be in the centre of the fork resulting in the wheel looking like this when fitted ?
This is because single speed wheels have no dish and equal length spokes , I was able to dish the wheel and bring the centre of the tyre into the centre of the fork only to find the spokes were almost vertical and the rear mech now hit the spokes/rim before first gear was reached.
So what to do ?
I cut the lower legs free and marked the centre of the wheel hub on an axle then bolted on the lower legs and lined that assembly up with the centre of the upper fork part.
4 tack welds later and it looked fair [ good would be pushing it ! ] so having a free undished wheel I tried that and it looks good,
Next up see if the rear mech works properly and I can get first gear without wheel contact.
Drawing a blank on reasonably priced pulleys I am revisiting the 2 chain solution , however this time more parts will be adjustable instead of just 2 front 28T sprockets bolted back to back as the main combiner.
Although mine seems to be the other way around with the cranks driving the rear sprocket and hoping the front sprocket will drive the cassette ?
More pictures to come.
Paul
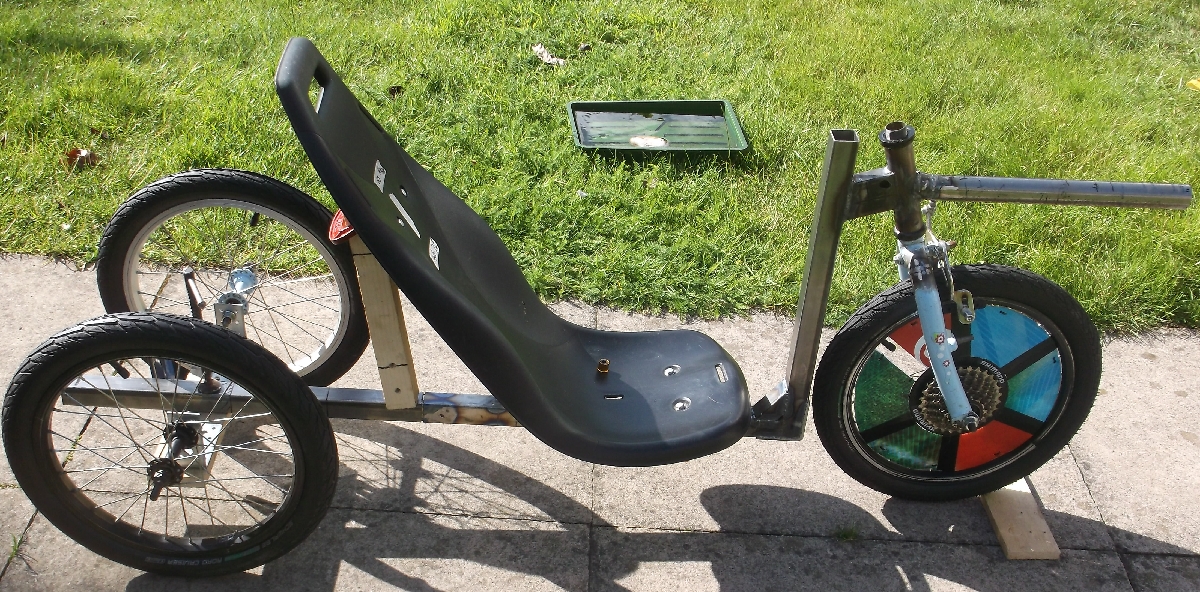
So a little more progress...
WARNING ------------------ These pictures contain wood ---------------WARNING
If that offends you please don't look !
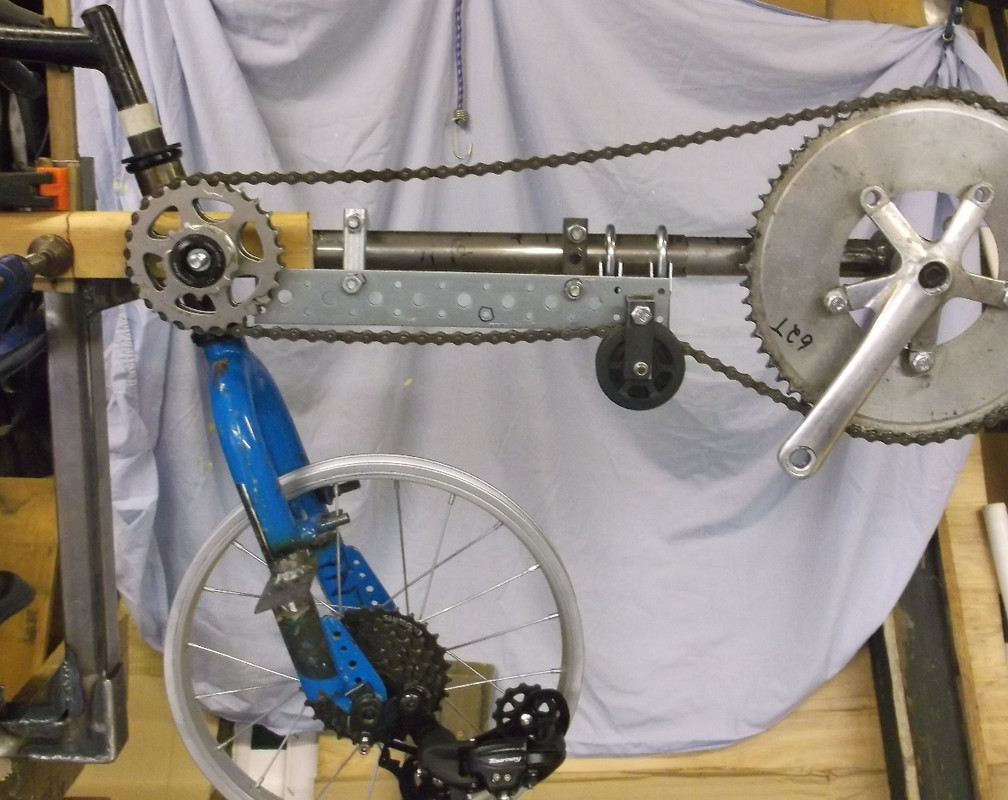
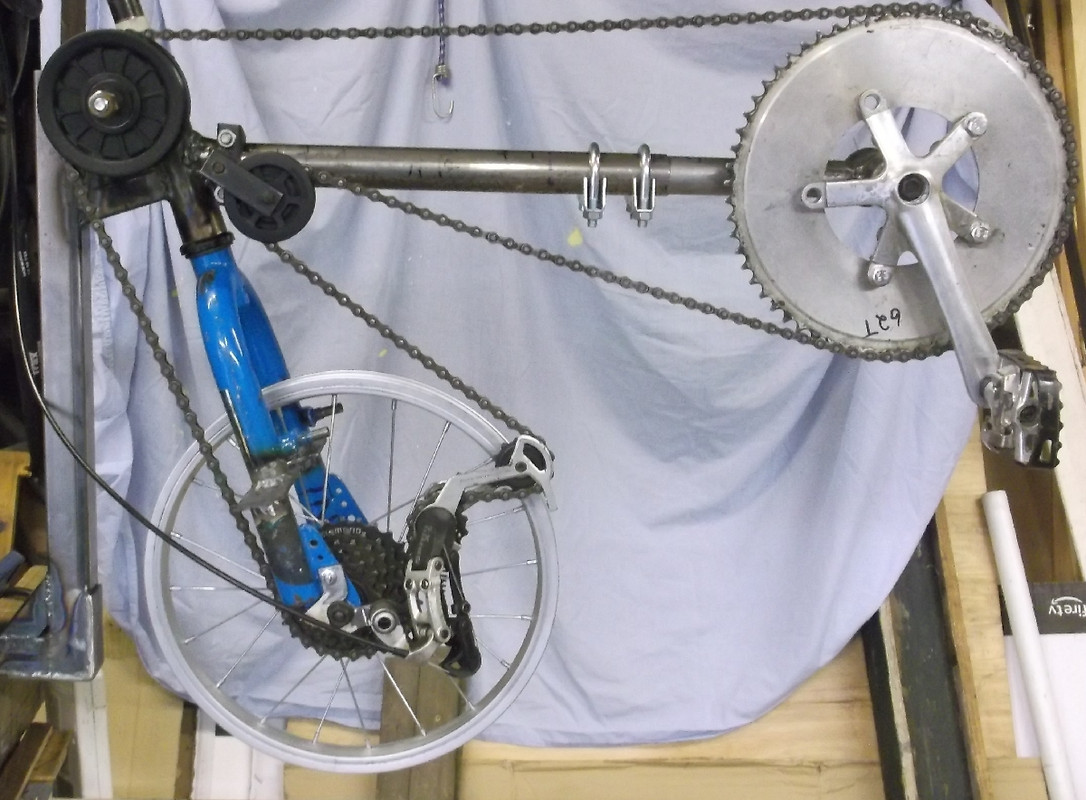
This is [ on my trike ] the rear chain so cranks to joiner [ name I have given to double sprocket on left [ cos I can't spell combiner ]]
Consisting of :-
Joiner a pair of 26T sprockets from a freehub cassette [ as I only had 1 x 28T [ well i could find ]] mounted on a freehub with the pawls removed and currently bolted to a piece of wood to try and find the optimum position.

Tension-er consisting of a Shimano Nexus chain tensioner meant for a Nexus hub application [ I think ]
62T chain ring.
Current task is to get the rear chain as close to the frame as possible , so it does not interfere with my legs , and in a straight a line as possible.
At the moment the wood thickness is stopping the free hub going further towards the frame , I also think the joiner needs to be higher and further towards the rear.

Get the bolt it rotates on here.
The chain ring is just using bolts and nuts to space it away from the spider
The tensioner is poor , there is no tension spring and the whole thing needs dismantling to get the chain out , however it does come with a build in chain keeper !
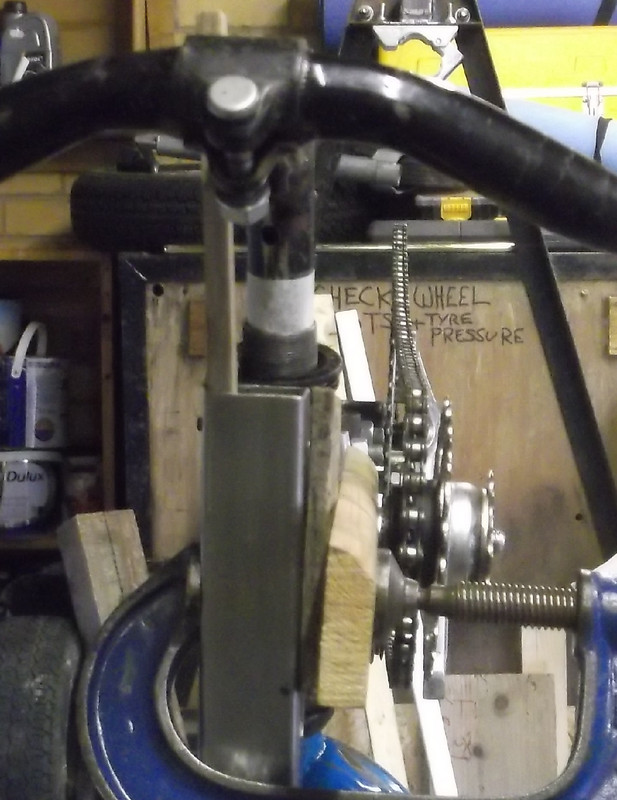
Whilst everything looks OK from the side it is a different story from the front or back.
So with added lines
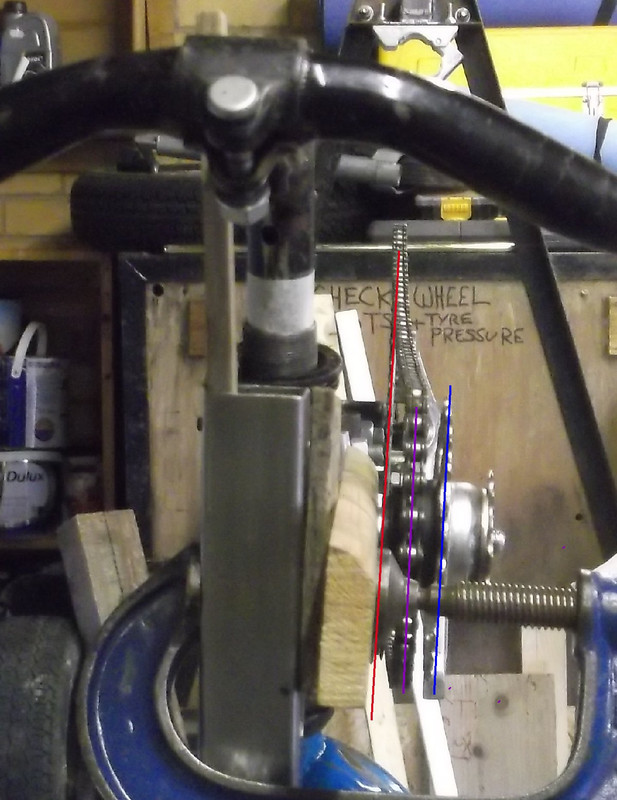
Red line is through crank chain ring , now this should line up with the purple line through the inner cassette sprocket as can be seen with the chain route.
Blue line is for drive to wheel cassette , this can now be spaced further away from chain sprocket with cassette spacers on joiner to try and get it in the middle of the wheel cassette.
It may need a short chain tube only fastened at the upper end nearest the joiner sprocket to avoid it derailing when turning [ else sprocket side plates may be needed ? ]
This has gone through 3 iterations today and some tweaking however it seems to work ?
First time I though I had it I absent minded-ly pedalled backwards only for there to be a loud clattering noise and the whole chain was on the floor , obviously that could be very inconvenient/dangerous and so must be diagnosed and fixed before I look at front sprocket/cassette chain.
This tinkering is extremely time consuming especially as I can find nothing on the net telling you how to go about this ?
Also have to be conscious of problems reported with commercial twisting chain bike where they do not like to be moved backwards with the steering pointing ANYWHERE but forwards !
Paul
WARNING ------------------ These pictures contain wood ---------------WARNING
If that offends you please don't look !
This is [ on my trike ] the rear chain so cranks to joiner [ name I have given to double sprocket on left [ cos I can't spell combiner
]]Consisting of :-
Joiner a pair of 26T sprockets from a freehub cassette [ as I only had 1 x 28T [ well i could find ]] mounted on a freehub with the pawls removed and currently bolted to a piece of wood to try and find the optimum position.
Tension-er consisting of a Shimano Nexus chain tensioner meant for a Nexus hub application [ I think ]
62T chain ring.
Current task is to get the rear chain as close to the frame as possible , so it does not interfere with my legs , and in a straight a line as possible.
At the moment the wood thickness is stopping the free hub going further towards the frame , I also think the joiner needs to be higher and further towards the rear.
Get the bolt it rotates on here.
The chain ring is just using bolts and nuts to space it away from the spider
The tensioner is poor , there is no tension spring and the whole thing needs dismantling to get the chain out , however it does come with a build in chain keeper !
Whilst everything looks OK from the side it is a different story from the front or back.
So with added lines
Red line is through crank chain ring , now this should line up with the purple line through the inner cassette sprocket as can be seen with the chain route.
Blue line is for drive to wheel cassette , this can now be spaced further away from chain sprocket with cassette spacers on joiner to try and get it in the middle of the wheel cassette.
It may need a short chain tube only fastened at the upper end nearest the joiner sprocket to avoid it derailing when turning [ else sprocket side plates may be needed ? ]
This has gone through 3 iterations today and some tweaking however it seems to work ?
First time I though I had it I absent minded-ly pedalled backwards only for there to be a loud clattering noise and the whole chain was on the floor , obviously that could be very inconvenient/dangerous and so must be diagnosed and fixed before I look at front sprocket/cassette chain.
This tinkering is extremely time consuming especially as I can find nothing on the net telling you how to go about this ?
Also have to be conscious of problems reported with commercial twisting chain bike where they do not like to be moved backwards with the steering pointing ANYWHERE but forwards !
Paul
Last edited:
OK so spent yesterday at Darley Moor race track talking to a Raptobike owner someone with a Cobra and the designer/builder of NotSo caught here cornering FAST !

Seems by accident I have found some of the needed changes for FWD , offset fork and non dished drive wheel.
So back to the garage , whist I seemed to have the 2 chain solution close to working I am awaiting some m/c rollers from Ebay so I put it aside and tried a 1 chain solution as all the commercial bikes I saw.
First glance would seem to indicate I have cracked it hurrah you say [ maybe the whinging will stop ? ] sorry no
This can be pedalled both forwards and backwards and with the steering turned in both directions.
However there are some major problems need fixing before a ride can be tried.
a) it is very hard to pedal - I think this is a chain line issue on the power side ?
As can be seen by the upper out of focus chain line the big pulley needs to be much closer to the head tube and the pedal crank ring needs to be further out from the frame
b) this pulley will have a very short life - someone in the BHPC tried one [ I bought the same from RS components ] however in service it had a very short life and the chain destroyed it.
 so I need a replacement
c) this pulley needs to pivot about a line coming from the axle of the big pulley and be moved as close to it as possible
 otherwise it works well.
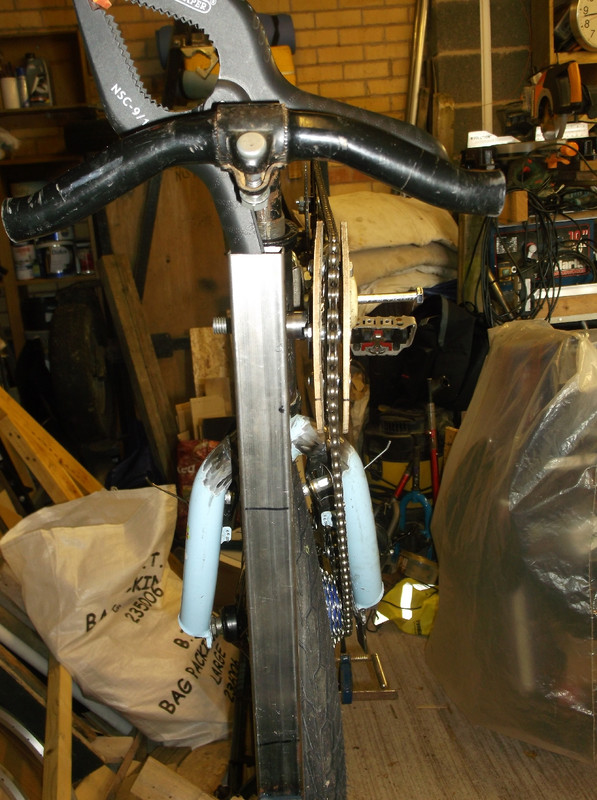
d) I need to weld the rear mech hanger to the drop out on the fork that will move the mech inwards 4mm and then I should be able to get 1st gear.
So I have eliminated chain/fork contact in the higher gears , however I could do with a fork with non bent legs and the dropouts at the end of the legs and not extending forwards to give trail , trail will have to come from fork rake only. This will move the cassette backwards and allow the big pulley to go forwards making the chain line more parallel to the fork [ the holy grail , allegedly ] however on reflection that is only in 1 gear so maybe I should shoot for the upper middle of the 8 speed thus causing an equal amount of torture which ever direction the chain moves in. All this of course would mean a new bike as there is insufficient clearance for the wheel to go backwards that far !
This set up stops the rear mech contacting the spokes/tyre when going for 1st , picture below it is in 2nd with still some space for it to move further in.
This is the crazy chain angle on the return side for a right turn , should improve and maybe give a couple more degrees when the little pulley pivots.
So much to do , however pedalling it is a milestone of sorts.
Paul
Seems by accident I have found some of the needed changes for FWD , offset fork and non dished drive wheel.
So back to the garage , whist I seemed to have the 2 chain solution close to working I am awaiting some m/c rollers from Ebay so I put it aside and tried a 1 chain solution as all the commercial bikes I saw.
First glance would seem to indicate I have cracked it hurrah you say [ maybe the whinging will stop ? ] sorry no
This can be pedalled both forwards and backwards and with the steering turned in both directions.
However there are some major problems need fixing before a ride can be tried.
a) it is very hard to pedal - I think this is a chain line issue on the power side ?
As can be seen by the upper out of focus chain line the big pulley needs to be much closer to the head tube and the pedal crank ring needs to be further out from the frame
b) this pulley will have a very short life - someone in the BHPC tried one [ I bought the same from RS components ] however in service it had a very short life and the chain destroyed it.
c) this pulley needs to pivot about a line coming from the axle of the big pulley and be moved as close to it as possible
d) I need to weld the rear mech hanger to the drop out on the fork that will move the mech inwards 4mm and then I should be able to get 1st gear.
So I have eliminated chain/fork contact in the higher gears , however I could do with a fork with non bent legs and the dropouts at the end of the legs and not extending forwards to give trail , trail will have to come from fork rake only. This will move the cassette backwards and allow the big pulley to go forwards making the chain line more parallel to the fork [ the holy grail , allegedly ] however on reflection that is only in 1 gear so maybe I should shoot for the upper middle of the 8 speed thus causing an equal amount of torture which ever direction the chain moves in. All this of course would mean a new bike as there is insufficient clearance for the wheel to go backwards that far !
This set up stops the rear mech contacting the spokes/tyre when going for 1st , picture below it is in 2nd with still some space for it to move further in.
This is the crazy chain angle on the return side for a right turn , should improve and maybe give a couple more degrees when the little pulley pivots.
So much to do , however pedalling it is a milestone of sorts.
Paul
A question I have asked myself [ and DannyC mentions most calls ] however I only have a Nexus 7 which won't have the gearing for racing unless I go to a 2 or 3 ring up front , all the stream liners have a 1 x transmission and I was trying to do the same.How much easier would this be with a Nexus 7/8?
So I wanted a 1 x 8 made up of 62T x 36T - 11T should be do able , the Nexus 7 is only equivalent to a 28T - 14T very short of range , of course I have an unused Nuvinci 360 it's got the range however the weight and sheer size of it makes your eyes water .
The N360 model announced early September 2010 weighs 2.45 kg (5.4 lb).[14] That same article points out that "the combined weight of Shimano SLX front and rear derailleurs, shifters, freehub and cassette comes out to about 1.3 kg (2.9 lb)"
The wheels are 16" unsure how hard it would be to spoke a Nexus/Nuvinci into such a small rim ?
Paul
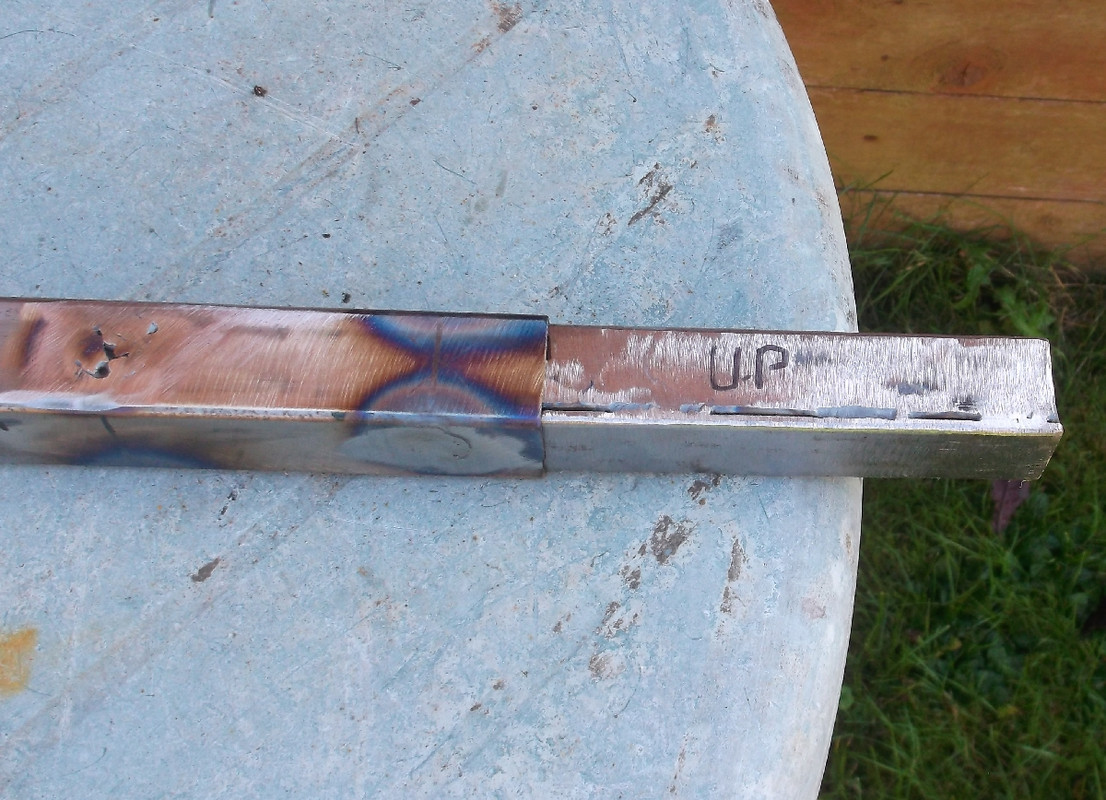
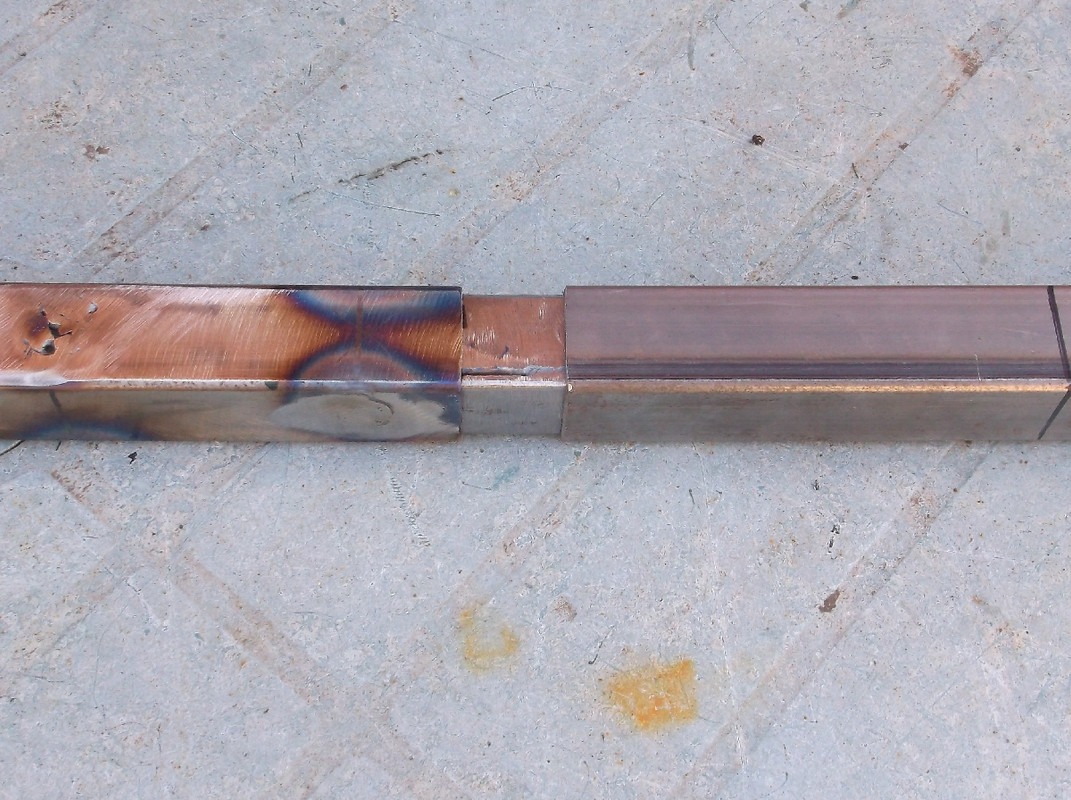
Need to get this ridable ASAP so first up finish welding fork :-
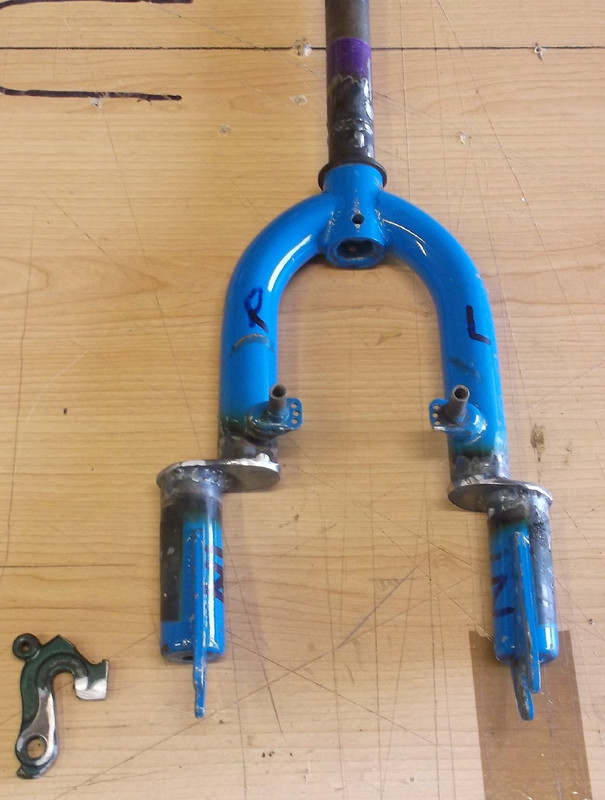 so one ugly asymmetrical fork fully welded [ lumpy ] and all the sharp corners rounded.
Next up need the green bit welding on :-

Although it looks a little short ? any ways up I found this :-

So I printed it out and pasted the bottom right onto some card , tomorrow I will cut it out and put it behind my fork drop out and I can see where to trim the existing hanger down and get it welded on , well after the friends have been [ dam domestic duties ]
Paul
Next up need the green bit welding on :-
Although it looks a little short ? any ways up I found this :-
So I printed it out and pasted the bottom right onto some card , tomorrow I will cut it out and put it behind my fork drop out and I can see where to trim the existing hanger down and get it welded on , well after the friends have been [ dam domestic duties ]
Paul
Last edited: